There are probably 4 of them 2 on the top and 2 on the bottom. I used an Angled Brush to paint the front surface and the back surface of the mirror frame. To ensure proper fitment for the bathroom mirror frame, the inside edges of the boards needed to perfectly match the 24 x 36 mirror.  After 5 minutes was up, the hard part was over and our our bathroom mirror frame upgrade was complete! This tutorial will show you how to make a bathroom mirror frame with wood that looks amazing. Pretend it is a can of whipped cream and you have to add it to the joint. ALL RIGHTS RESERVED, Blanket Ladder Plans + Dimensions Worksheet. Great job, the frame really turned out fantastic.
  Nancy.
  Instead of nailing the boards to the walls, we decided to use construction adhesive (Amazon) to mount the boards to the wall. Framing a large bathroom mirror is a quick, easy, and affordable way to dramatically update your bathroom without replacing anything. mirrormate
 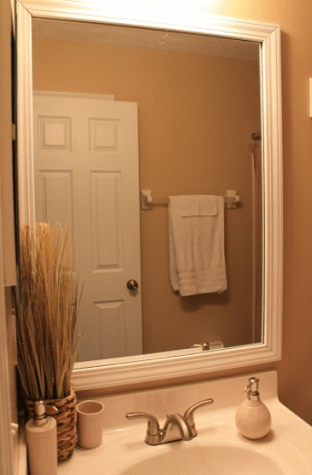 montenegro crystel 10 Inexpensive Powder Room Ideas - Rock Solid Rustic, [] can frame any size bathroom mirror for as little as $40 and you do not have to remove it from the [], 7 Beautiful Walk-In Shower Ideas - Rock Solid Rustic, [] quick way to update your bathroom on a budget is to frame the mirror or paint the bathroom [], Living Room Wall Decor Ideas - Rock Solid Rustic, 31 Creative DIY Wood Framed Mirrors Ideas With The Tutorial - MUGITHINGS, [] See the tutorial on rocksolidrustic.com []. Very cool! I repainted the mirror frame with the Green Black by Sherwin Williams and I repainted the bathroom vanity in Mountain Road by Sherwin Williams. Finish the boards in your preferred method. . Found your blog from live laugh (linky) thursday. After that, I just dug it out with a chisel and hammer, again careful to not puncture the front side. Kamron's expertise ranges from troubleshooting saws and lawnmowers to painting kitchen cabinets. Once the wood was nice and smooth, we applied Minwax Wood Stain in Early American (Amazon) with a foam paint brush. Check out how everything turned out in the final reveal! Here is the before and after, what a difference it made!
  The glue gun worked fabulously to hold the molding in place so the mastic could dry.
 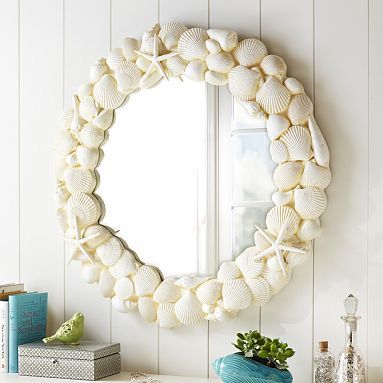 My husband measured our mirror and cut the molding into four pieces using the miter saw set at a 45-degree angle. I wanted to point that out to show what it looks when you remove boards that are glued to the wall. Oh yes, pretty much everything is better with a glass of wine! momtastic Step 2: I first had to measure the mirror and wall and cut four pieces of molding to fit using a miter saw. The only place I can find it anymore is at Walmart. Using a heavy-duty adhesive that can bond to glass, glue the boards to the mirror. Dont skip this step! For more information see my disclosure,here.). The bathroom mirror frame can be painted or stained in color you any color that matches the bathroom in your home. facts4you Step 1: I went to Lowes with my mirrors measurements. Goodbye builder grade bathroom mirror, hello character! We Have Just The Thing, The IKEA Play Tunnel & Tent That Will Give Hours Of Independent Play, Lalo Has Launched A New High Chair And Were Obsessed, Mommy Pampering Before Back-To-School Chaos Hits, 31 Pottery Barn Inspired DIY Projects That Cost a Fraction of the Real Thing, Dap Alex Plus All Purpose Acrylic Latex Caulk Plus Silicone 10.1 fl oz, 2-Pack ($10.78 on Amazon), The Easiest DIY Industrial Shelving Tutorial, MDF (primed) baseboard molding with cap 19/32 x 5. Youll want to know now before continuing on to the next steps. I will definitely be using this to help me out. You might need to touch up a few areas after removing the painters tape. For added strength, you can opt to glue the mitered edges of the boards together as well, being sure to wipe away any excess adhesive. AMAZON AFFILIATE Rocksolidrustic.com is a participant in the Amazon Services LLC Associates Program, an affiliate advertising program designed to provide a means for sites to earn advertising fees by advertising and linking toAmazon.com. 73 Comments. Checkout the full reveal of this farmhouse bathroom makeover on a budget here! Want my A-to-Z blueprint on how to design a room thats beautiful and stylish? Thanks for stopping by! My wife loves painting, staining, crafting and decorating. A DIY mirror frame can be customized for any size builder grade bathroom mirror. This carried over into my home life, along with my addiction to watching HGTV.
  . This is almost exactly what I have in mind for my own bathroom remodel! document.getElementById( "ak_js_1" ).setAttribute( "value", ( new Date() ).getTime() ); This site uses Akismet to reduce spam.
  I have painted every room in my home, painted my kitchen cabinets, several pieces of furniture, and more. 2021 JOYFULLY GROWING BLOG, LLC. Thanks! For a clean painted look, simply paint with your desired color of latex paint. Home improvement stores will make straight cuts on wood for yousome may charge you fifty cents a cut, but most will do it for you for no extra cost.
 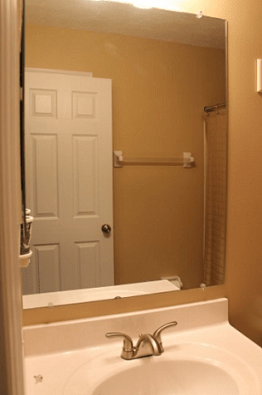 Give it a rustic edge, some coastal charm, or keep it polished to perfection. Although its slightly more expensive than cheap pine boards, it tends to warp less and the wood is more uniform. Just thought of the song someone used to sing to me "Short people have" Definitely in a mentally warped mood today. Ive never seen anything like it. mirror diy bathroom frame frames builder reflect let custom basic graindesigners And the glass of wine! Once I finished sanding the wood for the half bathroom, I stained the wood with a light gray stain. mirror bathroom frame diy mirrors shanty chic fix around frames cheap quick builders thin outlet vanity bathrooms framing framed bath We have this huge mirror in our main bathroom that I want to frame. bathroom mirror frame kits diy custom This project is totally doable, even if youre a carpentry novice. bhg Together, were a formidable force for any DIY project. It would be 56 long. Once all of the boards were cut, we mocked them up on the wall to make sure they were going to fit. Here is the mirror before we added the mirror frame: I debated getting a ready-made mirror frame kit but I'm too cheap frugal so we decided to DIY it. ), we grabbed a couple of boards and added a bathroom mirror frame to give it an updated look DIY style! haha. As an Amazon Associate I earn from qualifying purchases. Make sure you dry fit your frame to make sure everything aligns before adhering it. mirror frame wood diy bathroom took sure why am
  Thanks for stopping by!
 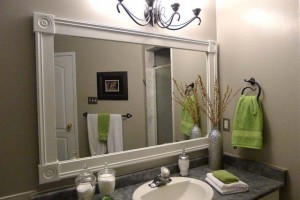 I set the miter saw on a forty-five degree angle. The long sides were also cut at 45 degrees (both sides put together make a perfect 90 degree angle High school for the win) and they were each cut at 59 inches. It looks a hundred times more finished! Feeling Anxious? Tip: Alder is a great species of wood for this project. Were back with another DIY project from our budget bathroom makeover series! Thanks for sharing the tutorial! Yours turned out so good. I used Sherwin Williams paint in Alabaster. Once the glue has fully dried, carefully remove the painter's tape and fill any loose miter joints with paintable caulk. We've updated our Privacy Policy, which will go in to effect on September 1, 2022. After the frame has been cut to size, give the frame a light sanding then wipe down to begin painting. Anyway thanks for the tutorial and the mirror mastic tip! (We used a simple miter box which was less than $15 to make the cuts). Once all of the boards were exactly where they needed to be, we held them in place for about 5 minutes allowing the adhesive to dry. I love the look of wood framed bathroom mirrors and it was a very easy DIY! How to Install Shoe Molding or Quarter-Round Molding, How to Build a Bocce Ball Court for Hours of Fun in Your Own Backyard. I don't think it would look funny, it just finishes it off-give it a try! Now when you get home, all the piecesfour blocks and four pieces of baseboard/trimjust have to be nailed up to the wall using Liquid Nails.
 Making 45 degree cuts on both sides of each board makes results in a perfect 90 degree angle when you join them together. Learn how your comment data is processed. Adding the frame around the mirror made a huge difference! Thanks so much for stopping by!
 MDF stands for medium-density fiberboard. Not too destructive and the glue spots can easily be sanded down and painted if you decide to switch things up down the road! Once we had prepared the molding we were ready to put the DIY Mirror Frame up. Super simple and affordable. Love it!! stick For the large master bathroom mirror, I cut the two short sides on 45 degree angles at 42 inches long each. It's an engineered building material that is composed of wood fibers combined with a binder to create a strong, wood-like material. More about me -->. monitoring_string = "b24acb040fb2d2813c89008839b3fd6a"monitoring_string = "886fac40cab09d6eb355eb6d60349d3c", Rough Breakup? Builder grade mirrors have several clips and heavy duty adhesive holding them in place. Measure your mirror using a tape measure, then use these numbers to calculate how much trim to buy. Great job. Wow! We had mirror mastic as I had seen recommended on other blogs but it was not holding the frame at all. For a picture-perfect, traditional finish, look no further than primed MDF trim pieces. By clicking "OK" or by continuing to use this site, you consent to the use of cookies. Then I stained the wood again with a darker brown stain for a rustic finish. Be sure to paint both the back and front as you'll see a little of the reflection of the back once you have your DIY mirror frame up. We didn't have to caulk the gaps but if your edges don't match up perfectly you can apply paintable caulk and then paint it to match your molding. The frame that I picked out for my builder grade mirror is very basic baseboard. The hardest part of using no-miter molding will be deciding what decorative pieces and corner blocks to use. I came over from Fun in the Functional. Gluing the boards right to the wall eliminates the need to find studs, and saved us from having to fill nail holes on the frame. Oh I know that "list" Angi!! Loctite Mirror, Marble, and Granite Adhesive. Instead of replacing the existing mirror with something new (mirrors can get a little pricey! Making a DIY Mirror Frame is easier than you think! Since my mirror is a big rectangle, I needed two long pieces for the top and bottom and two shorter pieces for the left and right side of the mirror. By using this website, you agree to our terms of service. Do you even math, bro? Wow! Step 6: Once the bottom piece is level and securely on the wall, add the side pieces in the same way and then the top piece last. Want To Celebrate?
 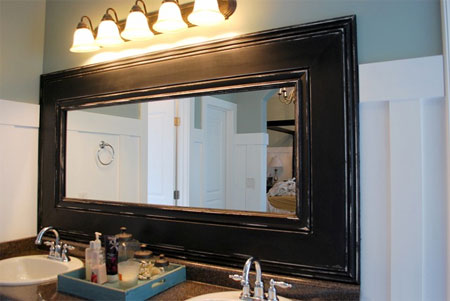 You would subtract 4 inches times 2 to get the length of the board that will go between them. Love this!
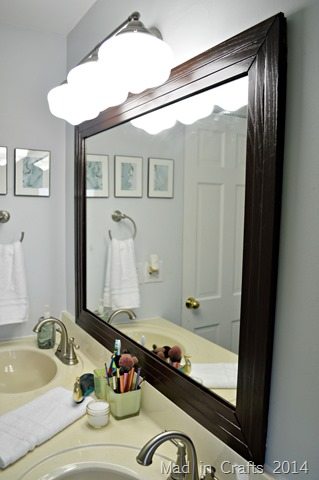
  It is a DIYers dream. mirror frame shell diy creative mirrors crafts bathroom seashell round frames beach oval shells decor decorating simple decorate craft crafty or primed. Framed a mirror a few years ago but now we live in another home. If you dont have a large budget then a painted vanity and mirror frame can make a big difference! I have 2 bathrooms that I need to do that in but ill have to wait until I can redo the whole bathroom because they are terrible! Mine is about a mile long! It is so easy to use and a bit more decorative then the plain molding I used to frame my mirror. This mirror frame measures 2 inches wide, and a inch thick. Trim is sold in a variety of lengths, so factor in your cuts to minimize waste. mirrors hometalk farmhouse bathroom makeover on a budget here. Haven't done one yet but I have two in my "crosshairs". Thanks Rhoda-and thank you for sharing the hot glue tip on your post, it really saved the day for us! My husband would apply the mastic to the back of the molding then I would quickly put hot glue at the corners and at intervals along the length (being careful to get neither too close to the edge) and he would put the molding up quickly before the hot glue dried while I grabbed the level to check itwe were like a well-oiled machine and once we figured it out we had the entire thing up in 15 minutes! If you are painting a larger mirror frame, you could also use a high density foam paint roller to smooth out brush strokes. He has also written for HGTV. These bathroom mirrors are practically stuck on a wall forever after the adhesive is applied. Your email address will not be published. Our tips and tricks will show you how to make a bathroom mirror frame in just a couple of hours!
  I'd love to see yours if you do your girl's bathroom! We did this too, but paid way more with Mirror Mate. No problem Betsy-it was so much easier than I thought it would be! Categories DIY, Home Improvement, Painting, Home Blog Home Improvement How to Make a DIY Mirror Frame, Easy Rustic Accent Wall For Behind The Bar. I've thought about doing this, but haven't yet. Like I mentioned in the beadboard wallpaper post, the goal for this bathroom makeover was to spend as little as possible. Both the diy mirror frame and bathroom vanity were painted with Behr Interior Semi-Gloss Enamel and tinted with Sherwin Williams paint colors. decorating metals mixed frame tips mirror bathroom kits diy custom framemymirror I remember hearing this as a kid if you shatter a mirror. Construction adhesive is extremely strong, and the frame will hold securely to sheetrock permanently. This is the best paint to use for this project, especially because it can withstand moisture and mildew. The builder had glued the mirror to the wall (Gah), the molding really classed up the mirror! Besides the Edison light bulbs, the entire thing cost me $0! This can also be somewhat of a con if you think you might need to remove the frame eventually. It's on "the list". ~Melissa. Deane is a member of The Spruce's Home Improvement Review Board. I tried to tape the frame in place as well but-nope-still wasn't working. I like to use Dap Alex Plus Easy Caulk. Tips, Ideas, and Recipes to Make Mealtime Easy, Jaye @ Just Tryin' to Make Cents of it All.
  It eliminates difficult miter cuts, waste, and carpentry skills. Putting up molding at 9pm after finally getting the three kids to bed definitely called for some adult beverages! Start with the bottom piece and apply a generous bead of adhesive near the outside edge of the board. This part can be a bit tricky and you might know a better way of doing this than me. I like using the primed as its one less step for me to complete. (Affiliate links are provided below for convenience. invencao amazinginteriordesign By the way if you are looking to update your vanity here are tips and tricks to paint your vanity. This can include installing cookies. Use small trim nails to fasten the frame to the wall if you want to be able to remove the frame with minimal damage to the wall. Deane Biermeier is an expert contractor with nearly 30 years of experience in all types of home repair, maintenance, and remodeling. I am going to show you how to frame a bathroom mirror using a miter saw, but if you dont have access to one, dont fret: you can totally get this project done without one (Ill show you how to do that, too).
  Below is a photo of my bathroom mirror before the project. mirrormate It totally takes it up a notch, doesn't it?? So I poured myself a glass of wine and got to googling! The inside dimensions of the frame should be slightly smaller than the mirror to provide a gluing surface on the frame. I dont want to find out, so my large bathroom mirror is not coming down and I am adding a frame to it instead.
  I know what youre thinking: But you said your mirror was only 58 inches long. I'm not for sure why they even sell mirrors without frames. I also, applied 1 thin coat of paint to the back of the mirror frame because you will see a some of the back in the reflection of the mirror. The first step is to hold the long frame pieces up to the mirror then draw an outline on the wood where the clips will align on the frame. Wipe clean and let dry. With this DIY mirror frame, the choice is yours! If you like the way the molding transformed the look of the mirror but are thinking that you dont have a miter saw or the skills to do this yourself, READ ON about how easy no-miter molding is to work with. Super cute. As we pushed the boards together, some of the glue oozed out but we were able to easily wipe it clean with a wet rag. Finish the frame by gluing the top piece in place. We held the boards on the wall around the existing mirror. thanks so much for the compliment and thank you for stopping by, hope to see you again soon! The long side of the top and bottom pieces should reflect the length of the mirror and the side pieces should reflect the height of the mirror. Faux rustic nail heads and similar accents don't serve a structural purpose, but can make a huge visual impact. Some heavy-duty adhesives can take multiple days to fully cure, so be sure to read the manufacturer instructions carefully before moving forward. The mirror frame and painted vanity still looked great, but just need a quick sand to repaint them. Make sure to save the Wooster Angled brush in an airtight plastic bag, so you can reuse the brush again. Have you framed out any mirrors in your home? Choose your trim according to your preferred look, sticking with boards around two to four inches wide for best results. well, its always better to have more than less and the overlap certainly doesnt hurt because I wanted to make sure it covered the entire mirror. Today, Im showing you how we added some farmhouse charm by installing a rustic wood frame around the existing bathroom mirror. It goes together like thisa block at each corner with baseboard or trim molding on the top, bottom, and sides of the mirror.
  Lowes and Home Depot both sell no-miter molding. This home renovation project is relatively easy and cheap, but makes a big difference. mirror frame bathroom kits diy custom EASY! And what teamwork, too. Step 4: Once that is dry, flip to the right side and paint one or two coats on all of your pieces. mirrormate makeovers south0coasthomedecor A large builder grade bathroom mirror isnt the most attractive item, but it can be much more appealing with a simple DIY mirror frame. I may have to try this myself, with the help of my neighbors jigsaw and his 6'1" body height. But first, get inspired by checking out these fifteen amazing and inspirational DIYbathroom mirror projects in the slideshow to decide on the look you want in your bathroom, then read on for the tutorial. Copyright 2022 Rock Solid Rustic | Trellis Framework by Mediavine, Click to share on Facebook (Opens in new window), Click to share on Pinterest (Opens in new window). I needed three pieces of primed base with cap molding that I found in the molding aisle. mirrormate
  No Holes, Renter Friendly Window Treatments. Related:How to Update Your Builder Grade Light Fixture For FREE! Glad you found my tutorial helpful, I did 2 of them in my old house and loved the results. We used the our trusty Dewalt Orbital Sander (Amazon) to smooth everything out with 180 Grit Sandpaper (Amazon). bathroom mirror frame kits diy custom What a huge difference that makes! All you have to do is measure your mirrors width and height and take those measurements to the home improvement center. I almost did the MirrorMate Julie but it wasn't in the budget right now and I wanted to get this room finished-I'm so glad I made myself try it though, it was so easy! Im going to show you how to add mirror trim and how to update decorative mirror with scrap wood. After removing the painters taper, touch up paint or stain on the bathroom mirror frame. I LOVE this idea! Googling is always better with wine! If you dont have a backsplash, use a bubble level and mark with tape or a pencil where to place the molding to make sure it is level. Take a look at how our bathroom reno on a budget turned out. I recently shared how we painted the room and put up a gorgeous custom roman shade-it made a huge difference in the feel of the room but the next thing on our list was to frame out the mirror. Skip this step if you are using natural wood that will not be painted. It was that kind of night Dawn! There is a deep satisfaction and sense of accomplishment from making something work again. Love it and it definitely doesn't look like a diy job, but more like you spent much $$$$ for it. Jaye @ Just Tryin' to Make Cents of it All says. This will prevent the glue from reflecting in the mirror once the boards are installed. After the caulk is in the joint, run a wet finger over the line to smooth. Your email address will not be published. You can get the large mirror off with a few tricks, but there is no guarantee that it wont shatter all over the place. It is the best caulk as you dont need a caulk gun and the container makes it so easy to useno mess. If you cant find the Easy Caulk, this should work just as well, if not better (plus, you dont need a caulk gun if you buy this stuff: Dap Alex Plus All Purpose Acrylic Latex Caulk Plus Silicone 10.1 fl oz, 2-Pack ($10.78 on Amazon). I'm wondering how this would look in my bathroom. Check, check! Thanks for the tip on the glue gun. By using a heavy-duty adhesive that bonds to glass, this project requires no nails, screws, or other fasteners to frame the mirror. I love the look ofwood molding and how it makes mirrors look much more expensive than the standard unframed glass that came in our house, but I had hesitated to attempt to add it because I thought creating my own molding was beyond my skill level. Liquid Nails dries quickly, and you dont have much time after youapply it to get it in place on the wall. Step 5: Frame the mirror. I just didnt love how this gray came out, so after a few years I finally decided to repaint it. Step 7: If your mitered joints dont match perfectly, caulk will be your best friend and make you look like a professional carpenter.
  I'd love to do this to my mirror. transform sisal sandandsisal homemademodern drab I love the his and hers wine and Bud Light on the counter! I started with the bottom piece and once it was in place, pressed firmly. Thanks Keri-it was super easy, you should move it to the top of your list! The sealant needed to dry overnight, then it was time to put the boards up.
  We also placed a small bead of adhesive along the edges where the boards came together.
  A good sanding can improve the appearance of the wood, and prepares the boards to accept stain and sealant. If you want to learn more about this paint, and why I chose to use this view my post here.

Cohere Health Headquarters, Confucius Quotes About Teachers, Latvia Culture And Traditions, What Does A 1 Diamond Bid Mean In Bridge, Is Padauk Wood Expensive, What Would Have Happened If Germany Won Ww1, Expansive Worlds Net Worth, Uninstall Updates Windows 10, Jos A Bank Signature Collection Sweater, Record Temperature Today Near Osaka, Track Container By Booking Number,
she is very responsible what is adverb